Tuesday, June 21, 2011

Family-Friendly Farm Recipes II

We have tried several new recipes over the past couple of weeks and I thought I would share some the the best.  As I have said in the past, this is just how I prepared the dishes and this should not be looked at as die-hard "recipes" but merely guides to follow loosely with what you have on hand.

PLUM PRESERVES FREEZER JELLY
I got this recipe from the Ball Blue Book Guide to Home Canning, Freezing, & Dehydration.  Chesney's babysitter has a plum tree.  She told us we could have as many as we wanted because they "just run over them with the lawn mower".  The recipe is for regular preserves, but it didn't set so I tried putting a jar in the freezer and it made great freezer jelly!  I also froze some whole plums to use later in smoothies; they can be frozen whole, with the pit still in.
Combine 5 cups pitted tart plums (about 2 1/2 pounds), 4 cups sugar, and 1 cup water.  Bring slowly to a boil, stirring until sugar dissolves.  Cook rapidly almost to gelling point, about 15 minutes.  As mixture thickens, stir frequently to prevent sticking.  Remove from heat.  Skim foam if necessary.  Ladle hot preserves into hot jars, leaving 1/4 inch headspace.  Adjust two-piece caps.  Process 15 minutes in a boiling-water canner.  Yield: about 5 half-pints.


RABBIT POT PIE
No one else in the family is keen on left-overs, so I have to find ways to disguise them as new foods.  This pot pie used leftover rabbit we had from the crockpot earlier in the week and was a HUGE hit.  I adapted the recipes from chicken pot pie recipes on AllRecipes.com, changing them to fit our likes/dislikes and the ingredients we had available.
Crust:  Mix 2 cups whole wheat all-purpose flour, 1 teaspoon salt, 1 stick butter, and 1/3 cup spreadable butter (we ran out of stick butter) with a pastry blender (or use a fork, I don't personally own a pastry blender) until butter is in pea-size pieces.  Add 6 tablespoons cold water and stir until dough forms a ball.  Divide the ball in half.  Lightly flour a flat surface and a rolling pin.  Roll out one half of the dough to fit a standard pie pan.  Place in the pan, make holes in the bottom with a fork, and bake 5 minutes.  Meanwhile, roll out the second half of the dough then set aside.
Filling: Mix approximately 2 1/2 cups shredded rabbit, 10 sliced baby carrots, 1 cup frozen peas, and 1 cup frozen corn in a saucepan.  Just cover with water and boil 15 minutes.  Drain and set aside.  In a sauce pan (or I used a large frying pan), make a roux with 1/3 cup butter and 1/3 cup whole grain all-purpose flour.  Add 1/2 teaspoon salt, 1/4 teaspoon pepper, 1/2 teaspoon garlic salt, 1 3/4 cups water, and 2/3 cup milk.  Simmer until thick.  Pour rabbit/vegetable mixture into bottom pie crust.  Pour thickened sauce over the rabbit/vegetable mixture.  Top with second half of rolled pie crust, making sure to seal edges.  Poke several slits into the top.  Cook approximately 30 minutes.  Allow to cool slightly before eating.


CHICKEN AND NOODLES
This is another recipe using leftovers, this time from the white meat leftover from our first taste of free-range chicken.  It was also adapted from recipes on AllRecipes.com. 
Boil chicken bones in 48oz water to create a chicken broth.  (I boiled them while I prepared the noodles, so I wasn't timing the boiling.)  Make noodles by mixing 1 egg for every 1/2 cup flour (we had two friends over, so I used 3 1/2 cups flour and 7 eggs,) 1/2 teaspoon salt, and enough water to make the mixture moist (I used approximately 6 tablespoons for 3 1/2 cups).  Lightly flour a flat surface and a rolling pin and roll out the dough till about 1/2 inch thick.  Cut into noodles using a floured butter knife.  Add approximately 2 cups shredded chicken and salt and pepper to taste to the boiling water.  Add the noodles one at a time (so they do not stick together) and cook 30 minutes.  Can be eaten alone or on top of mashed potatoes.


JOWL AND SPLIT PEAS
None of us had ever eaten pork jowl before, but we were delighted by how good it was with split peas.
Boil 1 pound split peas, 1 pound chopped pork jowl, 7 cups water, and salt, pepper, and garlic salt to taste for 45-60 minutes, until peas are softened (or "mushy" as I call it).  If you have extra liquid towards the end of cooking, remove it and reserve for an additional recipe.  We like split peas with corn bread or corn muffins (which I currently just make from a box).  

  
SPLIT PEA LIQUID RESERVE SOUP
I made this for lunch one day a couple of days after the split pea soup.  It was perfect for a quick meal for one, just add your favorite vegetables.  With a little more time, it would be good made on the stove with potato as one of the ingredients.
Fill a bowl slightly over halfway with liquid reserved from Jowl and Split Peas.  Add 3 sliced baby carrots and a handful of frozen corn.  Microwave till completely warmed through.


JOWL, SPINACH, AND GOAT CHEESE OMELET
I made this as a late lunch one day, around 2pm.  I do not drink a lot of coffee, but the strong tastes all blending together in this omelet had me craving a good dark French Roast so I made a cup...and it was wonderful.  Who needs sleep?
Fry 2 slices pork jowl in a medium-sized frying pan, leaving the melted fat in the pan after frying.  Cut jowl into small pieces and set aside.  Wilt a handful of fresh spinach in the jowl fat; remove and set aside.  Slightly beat 3 eggs and a splash of milk.  Cook in a frying pan.  When eggs are firm, put cut jowl, wilted spinach, and a handful of goat cheese on one side of the egg, flip the other side on top of fillings to create the omelet.  Allow to cook a few minutes longer to heat through.     

Monday, June 13, 2011

Butchering Day: A Step-by-Step First Experience

We butchered our first six chickens (and 12 more rabbits) Saturday.  We had been putting off butchering the chickens till we had a plucker, but we got tired of buying meat (and we finally have a freezer) so Matt rigged up a hand-held plucker and we were in business.  First, Isaac and I rounded up the roosters about to meat (make that, meet) their fate.


Meanwhile, Matt got his butchering gear together.


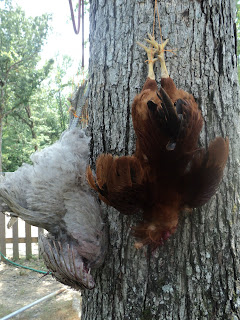
We started with the chickens.  First, Matt cut their heads off.  I wanted to see one run around with it's head cut off.  My grandma used to tell me they had a chicken run off into the bushes and get lost when she was a kid but I have also read "running around like a chicken with it's head cut off" is a myth and they don't really do it.  I wanted to find out for sure.  Maybe next time.  They did flap their wings a lot and twitch for a few minutes after being decapitated.  Matt tied rope shackles that he had made to their feet and hung them in a tree to bleed out.


While we were waiting, we started pulling feathers from their legs, just to see how hard they were to get out.  We were quite surprised by the Lavendar Orpingtons, they pulled out super-easy!  Like, um, pulling velcro apart.  (It really was that easy.)  The Non-Industrial Red roosters' feathers were a bit harder, but still not has hard as we'd expected.  (My only feather-plucking experience to date was with ducks...which was next to impossible.  Note: skin ducks!!!  You'll thank me later.)  It was a little weird to be pulling feathers off a still warm chicken I had just seen alive a few minutes before...I don't know that's something you get used to right away.  (Nor the smell.  There was a horrible, lingering smell of something.  Probably death.  Two days...and a lot of cleaning...later the smell is still slightly detectable in the butchering area.)


Once the chickens were well-bled and we had the feathers off the legs (and most of the chicken except the wings for the Orpingtons), we took them inside to scald them.  We completely dipped them 10 times (I don't know why, but I tried different numbers of dips and 10 seemed to be magical) in water right around 150 degrees.  


Then we took the chickens outside and pulled the rest of the feathers off.  Actually, on the first one we tried Matt's hand-held plucker, but I found it just as fast and easy to hand-pull.  (If we'd known plucking were that easy we'd have started butchering months ago!)  Soon we had a product that looked more like the chicken I know and love.


We let the chickens soak in ice water for about 30 minutes, then we bagged them in freezer bags, wrote the contents and date, and stuck them in the new-to-us freezer.  The 12 rabbits were next.  (Sorry, but I can only write so much in one blog entry...details on rabbit butchering to come in the future.)  Even though it was enough meat to last 3-4 weeks, it barely made a dent in the chest freezer.


***And here's the rest of the story.  We ate our first homegrown, free-range chicken tonight.  I cooked the dark meat in butter and Lowry's (our go-to recipe for all meats).  The white meat I just put in a baking dish; no one in our family likes white meat, but I figured I would use it for spaghetti or chicken salad or some other leftover type of dish.  Well, let me just forewarn: free-range dark meat is DARK.  And a bit leather-ly.  (Ok, so we had to cut it with steak knives and Matt likened it to shoe leather.)  The meat in the picture is really that color, it is not because of the lighting.


Matt tried the white meat to see if it was any better.  The white meat was tender and juicy and tasted like a cross between store-purchased white and dark meats.  Lesson learned?  (1) Butcher chickens younger (these were just under a year old) (2) Don't bother with a chicken plucker and (3) White meat in a free range chicken is delicious!

Friday, June 10, 2011

Where's My Farm Family?

I had an epiphany today.  We need about 10 more kids.  Three of my grandparents came from huge families.  My paternal grandma was one of only three, but her husband made up for it by having something like sixteen kids in his family.  The old family photos were so chock-full of children I never actually counted them.  Another great memory of his old photos is his mother...my great-grandmother and name-sake;  she was super-short and only the youngest of the children (I would guess under 8-years-old) were shorter than her.  Anyway, enough reminiscing and back onto why we need more kids.

Today I needed to continue planting the garden, but we have people coming to look at the farm this weekend so I also wanted to clean out the barn.  And things like dishes, laundry, etc. in the house needed done.  By the time I got done with a little bit of the house and moving around chickens and most of what I wanted to clean in the barn, it was time to go pick up Chesney from daycare.  It was on my way to get her I thought "I would get so much more done if there were four or five of me".  Then I remembered an article I had read that stated farm families used to be so big because it didn't take much additional effort to raise additional food for each additional child (I have never used the word 'additional' so many times in one sentence!) but each child added a significant amount in labor. 

I figure 10 more kids should do us fine.  Of course, we would have to wait for each one to grow up, so maybe we should look into the adoption of older, farm-experienced children.  It would definitely save time and Matt doesn't want any more biological children.  (He is worried about genetic and/or birth problems; who isn't in this day and age?)  Of course, with more children we would need more rooms in the house.  And the cost of utilities would go up...and food costs, even though we produce all of our own meat, eggs, and milk now.  And we would need a small bus to drive everyone around.  (With the cost of fuel, who can afford that?)  Looks like I will just have to find a way to be several places at once.  Or find a way to never sleep.  Imagine what I could get done with that extra 5-8 hours per day!

Thursday, June 9, 2011

Mary, Mary, Quite Contrary

How does your garden grow?  Not very well, I'm afraid.  (But then, my name's not Mary, so maybe that's the secret.)  I planted.  And planted.  And planted.  All last week.  Then we went on vacation for 3 days.  We didn't plan this vacation, it was actually planned by Matt's family.  We (mostly I) had some doubts about going.  But the pigs were born before we left (one of my biggest worries) as well as a litter of rabbits (with no more due) and most of the flats of vegetable plants were transplanted, so we decided 3 days away from the farm would be a good break for us.  Our farmhand agreed to come in the mornings as well as evenings, so Sunday morning we took off for Kentucky Lake.  Unfortunately, while I was soaking in the pool my garden was drying away to an early demise.  We came back on Tuesday, AFTER ONLY 3 DAYS (I even watered them Sunday morning, so it was more like 2) and EVERYTHING was dead.  Maybe not everything.  While I was looking for any sign of life today, I think I found a Luffa and a squash.  Maybe a pumpkin.  Or maybe it was just wishful thinking, turning weeds into more than they are.  I am really upset about my Luffas.  They sounded like the greatest thing ever and I am definitely planting them again next year.  (We will also hopefully be making soap next year, so that should go together well in our future farm store!)  I am also upset about the zucchini.  I love me some zucchini cooked in butter, not to mention chocolate zucchini bread.  Mmmm.  So I spent today planting lots of seeds: summer squash, winter squash, corn, pole beans, cow peas, carrots. 

I always try to find the bright side to everything and the bright side today was this: the plants took up more space than we had planned so, since everything that needed transplanted died, Matt won't have to create a fourth garden plot.  I think.  We do still have a lot of seeds! 

Friday, June 3, 2011

Sore... Dirty... Tired....

For the past two days I have been transplanting vegetables from flats in our sunroom to garden plots outside.  All day each day.  And it's over 90 degrees.  And I'm not even halfway through the flats.  Then we STILL have actual seeds to plant.  AHHHH. 

I detassled from age 13-16.  (Those of you from Illinois will remember detassling!  For everyone else, you walk through a field and literally pull the tassle off thousands of corn plants in order to make sure the plants are only pollinated by the "male" row.  It is used to create seed corn and new hybrids.)  I used to see corn whether my eyes were open or closed, whether I was awake or asleep, whether I was in a corn field or not.  I am starting to feel like that now.  I close my eyes and I still see rows of tiny eggplants and squash.  At least I am that much closer to being done for the season!

Wednesday, June 1, 2011

Deep Mud + New Piglets = Bad News

Late yesterday evening our farmhand came in and told us the sow was laying on top of some of her piglets.  Not too concerned, I said I'd go check on them.  Well, she was definitely ON TOP of them.  Three were completely buried in mud and one, while not in the mud, had its head covered in mud.  They had all apparantly suffocated.  Up until this time, we had not realized how deep the mud wallow was.  I found out when I stepped in to pull them out and ended up knee deep.  Matt had to help pull me out.  Then we had a bit of a heated discussion about the lost piglets.  I was the one who had read Large Black Hogs fare better farrowing on pasture, therefore Matt said it was my fault the piglets had died.  I said I had read they do better on pasture, I had never read anything about mud wallows.  I reminded him we do not know for sure they would have all survived if he had put the sow up in the barn before farrowing, anyway.  Then he lamented a little about the $500+ we lost from if they'd stayed alive.  I reminded him: don't count your chickens before they are hatched, or your piglets before they are grown.  Besides, I figure it is better to figure out what is wrong with our set-up on the 75% Large Black piglets, which are worth less to us financially, than the pure bred piglets. 

The remaining three piglets are doing great.  We filled in the large mud wallow.  The sow tried to make a new one today, but at least we know it is not deep enough to bury the piglets!